PyNSim Architecture
Design
PyNSim consists of three main components: A Simulator, Engine and the network components, namely Network, Node, Link and Institution.
Node
A node represents a point in the network, normally representing some physical building or area of land within the network. A node must have a name and an x, y coordinate:
from pynsim import Node

n1 = Node(name="Node 1", x=0, y=0)
n2 = Node(name="Node 2", x=1, y=1)

#the base type identifies this as a node, rather than link for example
n1.base_type
#prints 'node'

#The component type is the name of the class
n1.component_type
#prints 'Node'
Link
At their most simplest, links simply connect nodes, but links can be more complex, with different types of links representing different types of connections, such as rivers, pipes, streams etc. Links can have their own attribute such as flow rate. A link must have a name and a start and end node.:
from pynsim import Link
l1 = Link(start_node=n1, end_node=n2, name="Link 1")
l1.base_type
#prints 'link'
Institution
An institution contains a subset of the nodes and links within a network. An institution typically represents a governing body, for example: ‘The department of water’ or ‘The department of agriculture’. There can be multiple institutions within a network and different institutions can contain the same nodes & links:
from pynsim import Institution
inst = Institution("All my links")

inst.base_type
#prints 'institution'

inst.add_link(l1)
inst.nodes
#print []
inst.links
#prints [Link(name=Link1, start_node=Node1, end_node=Node2)]
inst.instititions
#prints []
Network
A network contains nodes, links and institusions:
from pynsim import Network
n = Network("My example Network")

n.base_type
#prints 'network'

n.add_nodes(n1, n2)
n.add_link(l1)
n.add_institution(inst)

#we use shorthand in the comments here for brevity.
n.nodes
#prints [Node(name=Node1, x=0, y=0), Node(name=Node2, x=1, y=1)]

n.links
#prints [Link(name=Link1, start_node=Node1, end_node=Node2)]
n.institutions
#prints [Institution(name=All my links)]
Engine
In PyNSim, an engine is a piece of software which performs some action on a component. An engine reads values from the nodes and links within an institution, performs some calculation and then performs some type of save function, which usually sets values back on these nodes and links. These values may then be used in a subsequent engine run.
An engine must run on one component, so if a calculation is to be performed on multiple nodes and links, they must be contained within an institution:
from pynsim import Engine
e = Engine(target=n)
Simulator
The simulator class is what gets run by a user. It is a container for the appropriate models and components. In a simulator, timesteps are defined and the simulation is run. A simulation can be stopped or paused while it is running, but will only stop at the end of the currently running time step.
Multiple models can be specified for use in a model, and must be run in a specific order. This order is defined when setting up the simulation.
At each time step in the simulator, all the models are run in order.
The simulator applies an engine, or a number of engines, to a network over a number of specified time steps.
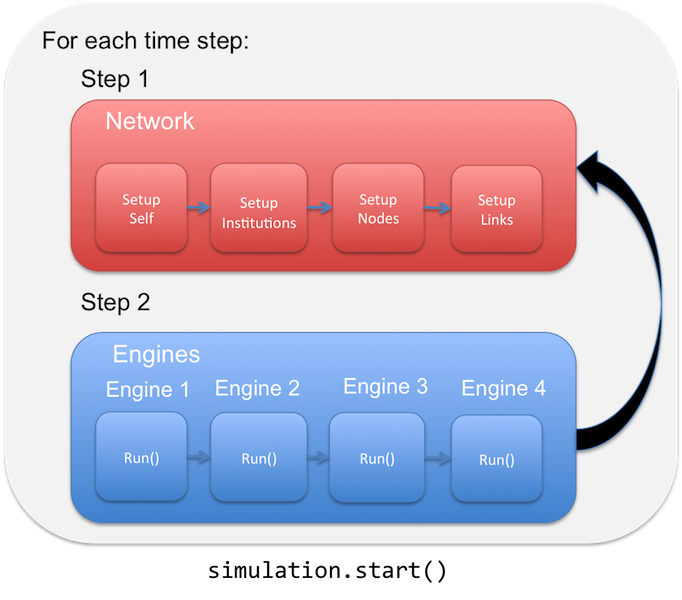
A simulation if PyNSim has the following workflow:
- A simulator is created (Creating the simulator).
- A network is created and added to the simulatori (Defining the network).
- An engine or number or engines are created (Defining the simulators’ engines).
- The engines are added to the simulator.
- The timesteps of the simulator are defined.
- The simulator start() function is called.
- The simulator iterates over all its timesteps. In each timestep:
- The setup() function of each Institution is called
- The setup() function of each Node is called
- The setup() function of each Link is called
- The run() function of each Engine is called.
- The simulation ends.
Setup Functions
Each node, link, network and institution in a pynsim model must implement a ‘def setup(self, timestep)’ function. This function is run at the start of each timestep before the engines are run. Setup functions are normally used to assign data to a component which will be used by engines in that time step. For example, a node might say ‘’My demand for this timestep is: 123’‘. The number 123 would normally be found in a pre-defined list or dictionary, which was defined when creating the node.
Class Structure
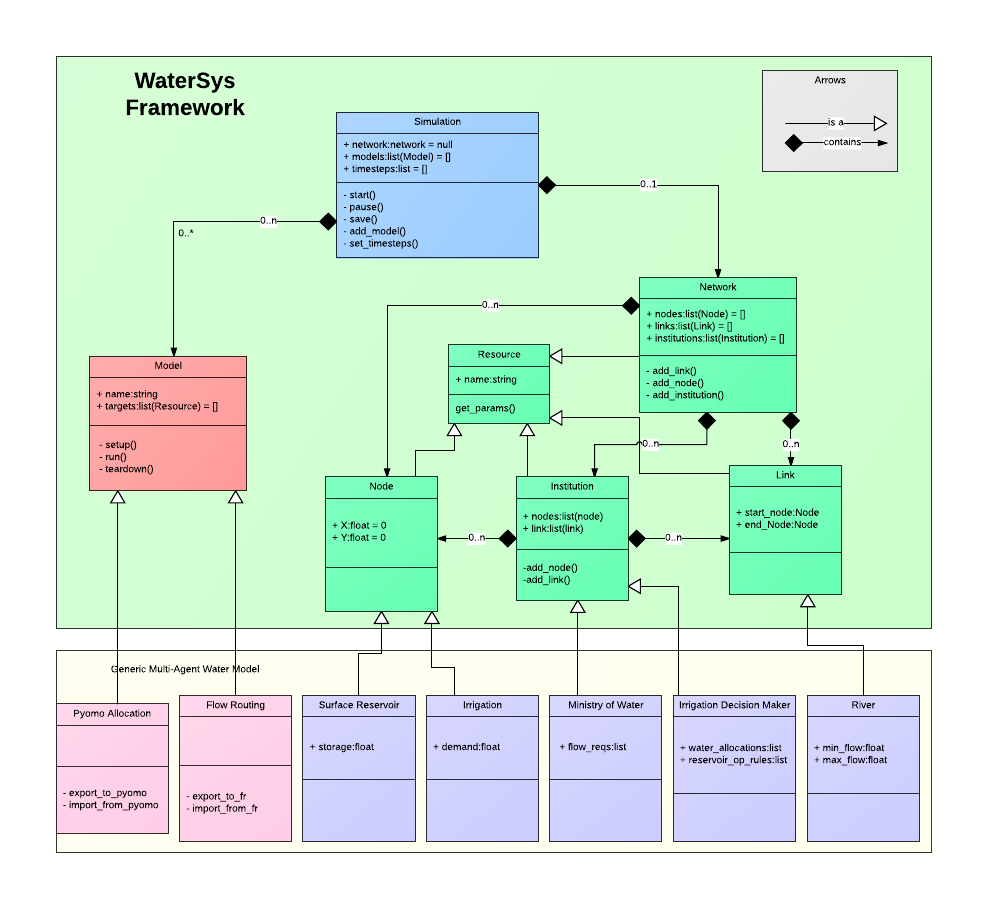
This UML diagram of PyNSim shows the different components with different colours. The blue box is the Simulator class. This class has exactly one Network and can have multiple Models. All components classes are shown in green. As shown, Network, Node, Link and Institution all inherit from component.
The model class, in pink, has a target, which must be a component.
The large green box represents the ‘core’ elements of PyNSim. These elements are meant to be extended for use in specific simulation types. This extention can be seen in the light beige box, in which two models types are defined alongside two node types, two institution types and a link type. We call this set of extentions a ‘Generic Water Model’.
When this set of classes is applied to a specific problem, we call it an Model
Defining Custom Types
The basic components of PyNSim can be extended for use in a specific application. For example, if a simulation of supply and demand is being run, two types of Node might be ‘Surface Reservoir’ (supply) and ‘Farm’ (demand). Each of these nodes will have its own attributes, for example ‘storage’ in the case of the reservoir and ‘demand’ in the case of the Farm. Links can be extented in much the same way; for example a ‘River’ is a link, which might have ‘maximum flow’ and ‘minimum’ flow parameters:
class SurfaceReservoir(Node):

    _properties = {
       'storage': 0 # the 0 is the default value
    }

    def setup(self, timestep):
        self.storage = math.rand()
Once created:
mynode = SurfaceReservoir("An example surface reservoir")
print mynode.storage
# print 0, as it is the default

print mynode.component_type
#prints 'SurfaceReservoir'

print mynode.base_type
#prints 'node'
Similarly, custom institutions can be defined, for example: ‘The ministry of water’ which controls all the nodes and therefore all the nodes in the network are contained within it and ‘Irrigation Decision Maker’, which only has control over the demand nodes. A model run on each of these insitutions will make decisions (set values) about their own nodes and links.
For an example on how custom types are defined, see here TODO: put in link here.
Defining Custom Engines
The base engine class must be extended to apply a new type of engine to a simulator. Every engine has a ‘run’ function, which must implement the actual engine run. This may involve writing python code to perform a calculation, but most likely it will involve accessing an external modelling system such as GAMS. The external model will be run, the results extracted and the component (on which every model must run) updated.
Example
This example shows how a water department might operate. A water department in our example is an instution in charge of all the nodes in the system. Using an allocation table, the water department assigns its reservoir a release based on the amount of water in the network at a given time step.
First, import a basic institution from pynsim:
from pynsim import Institution
Next create the water department class:
class WaterDepartment(Institution):
    name = "Government department in charge of water"
The _properties parameter of an institution must be defined. This defines what constitutes a water department:
_properties = dict(
    flow_requirements=[],
    allocation       = 1000
)
The water department release curve is an internal parameter to this institution and simply maps a reservoir release to an incoming water quantity:
#Based on rainfall in mm, how much will the surface reservoir get?
_release_curve = (
    (0 , 100),
    (10, 150),
    (20, 250),
    (30, 500),
    (40, 750),
    (50, 1000),
    (60, 1250),
    (70, 1500),
    (80, 1750),
    (90, 2000),
    (100, 2500),
)
The next step is the most important part of a pynsim class. It is the setup function. This is the place where at each timestep a component makes decisions about what to do. In this case, it finds the incoming water supply and sets the release from the reservoir:
def setup(self, timestamp):
    incoming_water = self.network.incoming_water_qty[timestamp]

    reservoir = self.getnodes("SurfaceReservoir")[0]

    for alloc in self._release_curve:
        if alloc[0] <= incoming_water:
            continue
        else:
            reservoir.release = alloc[1]
            break
To simplify, this function finds a node of a particular type in a network or institution:
def getnodes(self, component_type):

    nodes = []
    for n in self.nodes:
        if n.component_type == component_type:
            nodes.append(n)
    return nodes
Imports
First, the appropriate node, link and institution types must be imported from the desired package. In this example, we use the ‘jordanproject’ package:
from components import SurfaceReservoir, RiverSection, CitrusFarm, VegetableFarm
from components import WaterDepartment , IrrigationDecisionMaker
Next, we import the models we want to use:
from engines import DeficitAllocation
Finally, import the basic PyNSim stuff, like the simulator and a generic link We are assuming that for this example, there is no need to create a special type of link, so we use the basic one provided by pynsim:
from pynsim import Simulator, Network
Creating the simulator
The simulator file can be found here
First, create a new simulator:
s = Simulator()
Then define the timesteps the simulator will use:
s.set_timesteps(["2014-01-01", "2014-01-02", "2014-01-03"])
Instead of defining a list of timesteps it is also possible to let the function generate a time index. Three out of four optional arguments need to be supplied:
s.set_timesteps(None, start_time='2014-01-01 00:00', frequency='d', periods=3)
or:
s.set_timesteps(None, start_time='2014-01-01 00:00', frequency='d', end_time='2014-01-03 00:00')
For more information about defining a time index, please refer to the Pandas documentation.
Defining the network
Next, define the network structure by creating a new network, then creating the nodes and links:
n = JordanRiverNetwork(name="Example Jordan river network")
n.incoming_water_qty = {"2014-01-01" : 10,
                        "2014-02-01" : 22,
                        "2014-03-01" : 35,
                        "2014-04-01" : 22,
                        "2014-05-01" : 10}

irr1 = CitrusFarm(x=1,   y=2,   name="I1")
irr2 = CitrusFarm(x=10,  y=20,  name="I2")
irr3 = VegetableFarm(x=100, y=200, name="I3")

n.add_nodes(sr1, irr1, irr2, irr3)


#Create some links
n.add_link(RiverSection(start_node=sr1, end_node=irr1))
n.add_link(RiverSection(start_node=sr1, end_node=irr2))
n.add_link(RiverSection(start_node=sr1, end_node=irr3))
Next create the institutions in the network:
#The ministry of water has control over all the nodes
mow = WaterDepartment("Jordan Ministry of Water")
mow.add_nodes(sr1, irr1, irr2, irr3)

#The jordan valley authority has only control over the irrigation nodes
jva = IrrigationDecisionMaker("Jordan Valley Authority")
jva.add_nodes(irr1, irr2, irr3)

n.add_institutions(mow, jva)
- Now that the network is completely defined, add the network to the scenario::
- s.network = n
Defining the simulators’ engines
The next step is to introduce all the engines this simulation will use. Remember these have been included above, so adding them to the simulator is a simple matter of creating one of each like so, passing in the institution to which the model will be applied:
allocator = DeficitAllocation(n)
When adding engines to the simulator, it might be necessary to specify an order, so that one engine is run before another. Do do this, we call the ‘add_engine’ function with a paramater called ‘depends_on’. A model which depends on other models can only be run when each of its dependent models are run first:
# flow routing doesn't depend on any other engine
s.add_engine(allocator)
Finally, start the simulation:
s.start()
To print out the results of the defecit allocation, we look into each irrigation node and find out its deficit:
total_deficit = 0
for n in n.nodes:
    if n.component_type == 'irrigation':
        print "%s deficit = %s"%(n.name, n.deficit)
        total_deficit += n.deficit

print "Total deficit: %s"%(total_deficit)